Bricks Forge Pro Forms includes a Webhook action that lets you send form data to external services when a form is submitted. You can also add headers to your webhooks, which acts like a password to ensure only authorized forms are triggering the actions and preventing unauthorized webhooks.
This guide shows you how to trigger workflows in n8n, one of my favorite workflow automation tools, directly from your Bricks Forge forms.
We’ll cover setting up a Bricks Forge form to send a webhook to an n8n webhook trigger, secured with header authentication. By using the Webhook action’s settings – specifically the ability to add custom headers – you’ll be automating tasks and integrating Bricks Forge and n8n. Let’s get started.
Securing Your Webhooks: Header Authentication Explained
Webhooks provide a way to send data out from your website to an automation platform, like n8n.
But do you ever stop to think about securely sending your webhook data outside your website?
Security should be a focus of your form design and Bricks Forge gives us the option to add headers where we can define a password that our webhook is expected to see in the webhook header.
But why, John? Why should we care about security?
Well, unauthorized access to your webhook endpoints could trigger unintended workflows or expose sensitive data.
Header authentication is essential for security. This acts as a gatekeeper, verifying the legitimacy of incoming webhook requests.
n8n will only process a webhook if it contains a specific, pre-defined value in its header. Implementing this authentication method is a recommended practice to safeguard your workflows and data, mitigating potential risks.
By leveraging the webhooks action inside Bricks, you can configure the headers to pass the authentication requirements on the n8n side.
This means your n8n workflows are only executed by your website, not from bad actors online! Let’s explore the setup process and implement this security layer.
Super cool 🙂
Create A Header Auth Credential In n8n
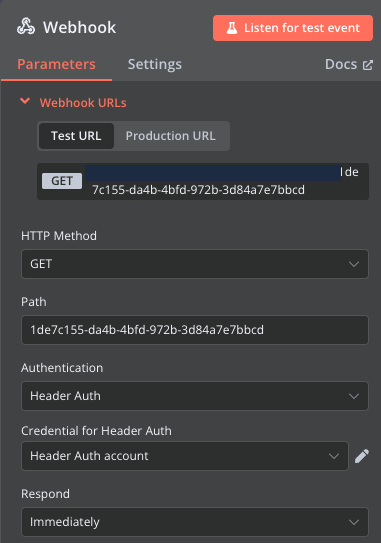
The first step is to create a webhook node in n8n. Make note and copy down the “Test URL” because we are going to paste this value into the Pro Form Later For testing. When you are happy with your setup, you can switch over to the Production URL.
It should look like this:
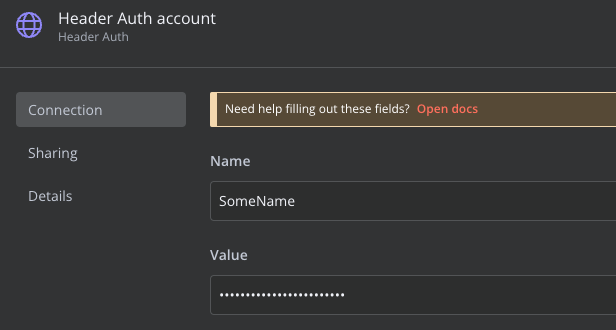
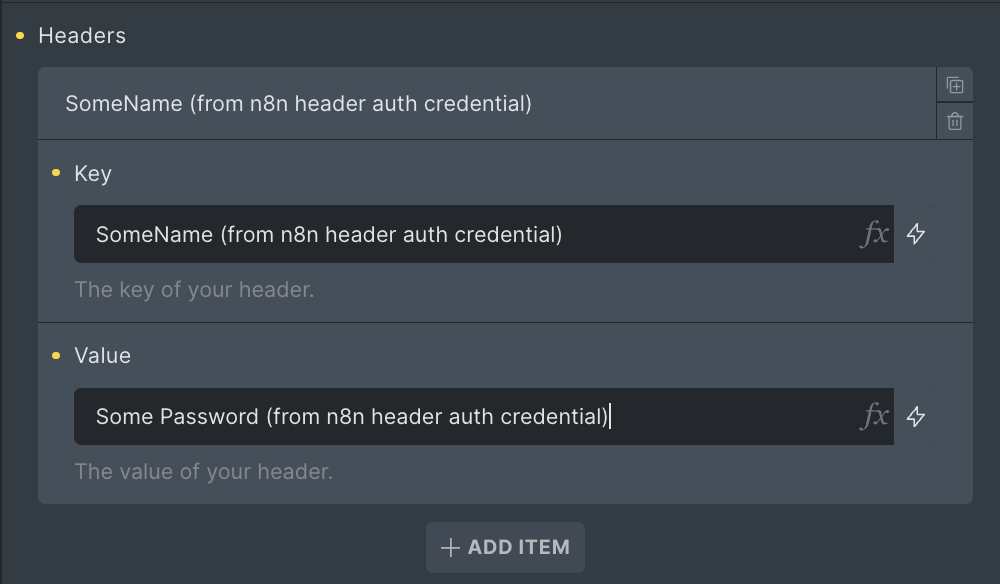
Next, select Header Auth and create a new credential. Add a user name in the “Name” field and your desired secret password in the “Value” field. Make sure to save this information somewhere safe so you can use it later inside Bricks Forge Pro Form.
That’s really all you have to do to get this step setup.
Setup Bricks Forge Pro From Webhook
Inside Bricks Builder:
- create a Bricks Forge Pro Form
- add your desired fields
- set the form action to “Webhook”
- Map your form fields into the data section of the
- Add A Header Item
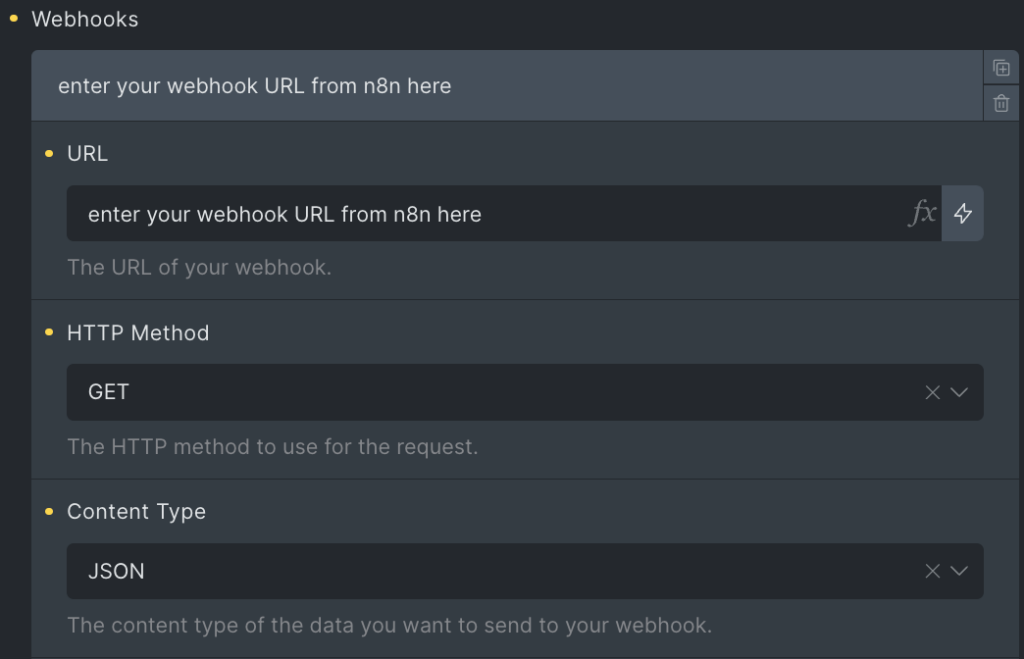
The images below show a basic webhook setup in Pro Forms.
The first image is the basic webhook action settings
- Add the webhook url from n8n
- Set the HTTP method to GET
- Set Content Type to Form Data or JSON (you can play around with both) If in doubt, just use form data.
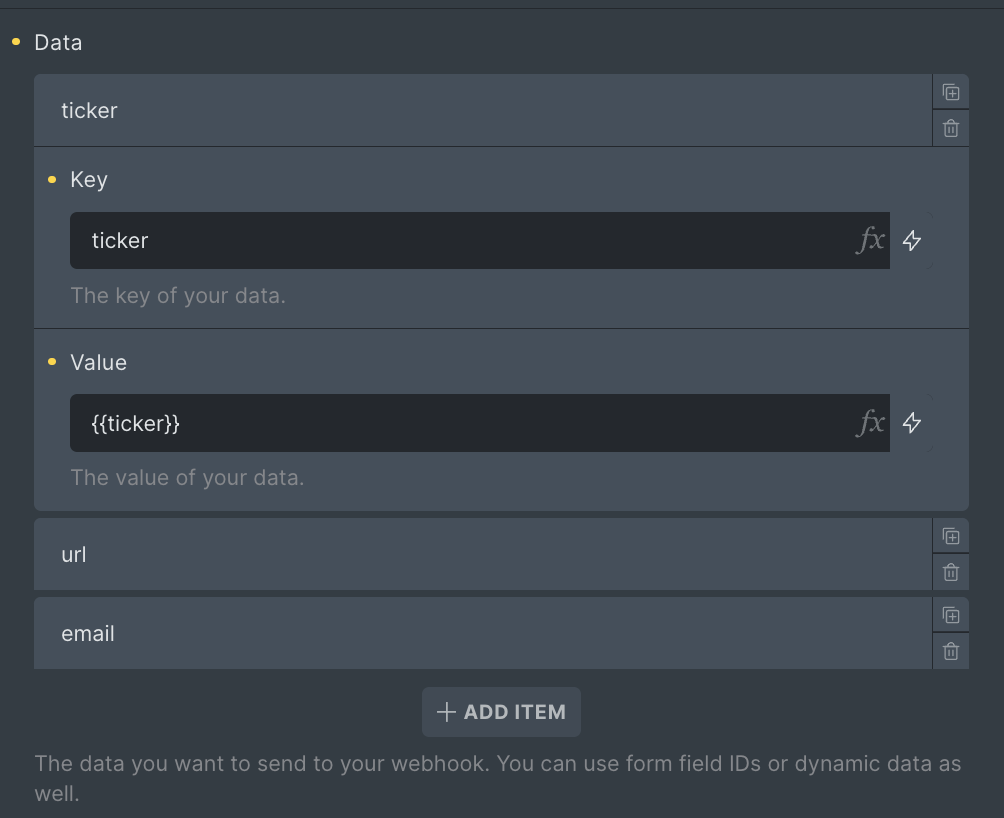
This image shows how I mapped my form fields into the data section of the webhook.
This section shows how I add my User Name and Password I created in n8n header auth credential. I added that image one more time right below this one.
I also like to check on the Debug option in Bricks Forge. This helps you see what response you got back from n8n in your browser console.

It’s Time To Test The Webhook
Inside n8n, find your webhook node and open it. Then click the “Listen for test event” button
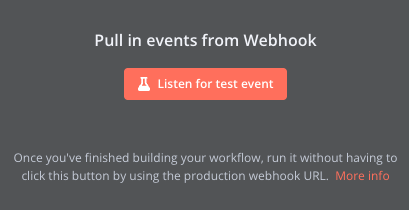
Once you click it, it will animate showing you its waiting for you to send the webhook from your Pro Form

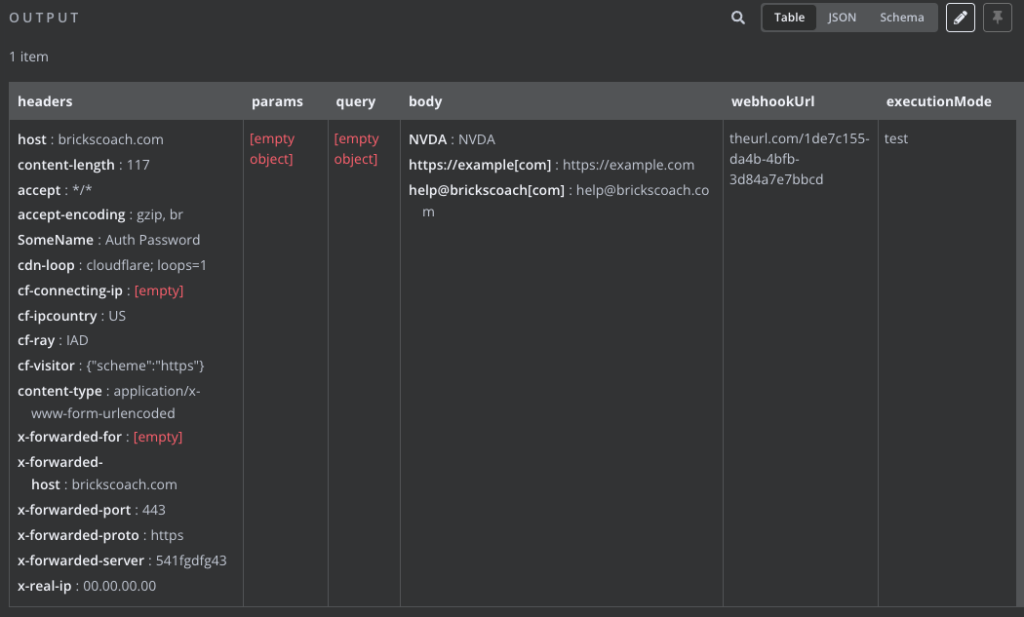
Head over to your Pro Form and view it on the front end. Next, fill out the data and submit the form. You can right click on the page with your Pro Form and select “Inspect” to see the response back from n8n. If you set everything up properly, you should get a response back! You should then immediately see your data come across in n8n’s output window of your webhook node.
If it worked, it will look like this:
Troubleshooting n8n webhook responses
You will most likely get 1 of 3 responses back from n8n:
- it worked
- it didn’t work because the webhook node was not listening in test mode
- it didn’t work because the header auth was incorrect
You didn’t click the listen for test event button:
{“code”:404,”message”:”The requested webhook \”1de7c155-da4b-4bfde7bbcd\” is not registered.”,“hint”:”Click the ‘Test workflow’ button on the canvas, then try again. (In test mode, the webhook only works for one call after you click this button)”}
You entered the wrong user name and password in Pro Forms Header Key:Value inputs
{
“response”: “Authorization data is wrong!”
}
Webhook Fired Successfully
{
“response”: “{\”message\”:\”Workflow was started\”}”
}
Frequently Asked Questions
What is the purpose of the Webhook action in Bricks Forge Pro Forms?
The Webhook action allows you to send data from your website’s forms to external services or automation platforms, like n8n, upon form submission. It lets you connect your website to other applications.
Why is header authentication important for webhooks?
Security is vital. Header authentication ensures that only authorized requests are processed by your webhook endpoint. This prevents unauthorized triggering of workflows and protects sensitive data from potential misuse.
How do I set up header authentication for a Bricks Forge Pro Form webhook?
First, create a Header Auth credential in n8n, noting the “Test URL” and your chosen username/password. Then, in Bricks Forge Pro Forms, add the webhook action and add an item with the header key and map the username and password.
What is the “Test URL” in n8n, and where do I use it?
The “Test URL” is provided by n8n’s webhook node in test mode. You paste this URL into the “URL” field within the Bricks Forge Pro Form’s webhook action for initial testing.
What are some common issues I might encounter when testing my webhook, and how can I troubleshoot them?
Common issues include: forgetting to click “Listen for test event” in n8n (resulting in a 404 error), incorrect username/password in the Pro Forms header fields (resulting in an authorization error), and not setting the correct content type. Make sure your n8n setup is good and that the information matches the settings that you created in Pro Forms. If you have the debug option in Bricks Forge checked you will be able to see the response from n8n if the webhook failed.
Wrapping Up
Integrating Bricks Forge Pro Forms with n8n allows you to create automated workflows triggered directly from your website.
Security is a key part of this process, and header authentication is really important in my opinion.
By following this guide, you can streamline your processes and added a security layer to your data and webhook processes.
Now, start building your automated workflows and securing your webhooks. If you encounter issues or have questions, don’t hesitate to reach out!
Need Help With Bricks Builder?