Bricks Builder has a deep integration with Meta Box and has the capability to query Meta Box Groups. Using the Bricks Builder query loop, you can loop through a group and return fields stored in the group. In this tutorial, we will learn how to set up a Meta Box group field and then query it using the Bricks Builder query loop.
What Is A Meta Box Group
The Meta Box Group allows you to group custom fields together. Groups can be nested, meaning you can have groups within groups. This gives you control over your website data and provides a structured way to organize data. You can clone groups, which is useful for repeating similar sets of information, like multiple images for a property listing or a product you are selling.
The Meta Box group supports all field types and settings from Meta Box. It’s designed to simplify content management, making it more intuitive to enter and maintain various information components related to a specific subject or section on your website.
Setup Meta Box Quick Step Guide
- create a new custom field
- Add a group
- Toggle “Cloneable” to on the group
- Add a “Single Image” subfield inside the group
- Adjust the labels and IDs of the group and subfields to your liking
- Set your custom field display conditions to posts or a custom post type
- Click “Publish”
Setup Meta Box Detailed Instructions
First, you need to create a new custom field and then create a group.
In your WordPress dashboard, find the Meta Box Icon, select “custom fields”, and click “Add New” at the top.
Your new custom field and group should look like the image below.
Important!! Make sure to give your group field a recognizable name so you can find it inside the Bricks query loop editor. If you leave the label as “Group” you will only see the word “Group” in the query loop.

Next, expand the group field and scroll down until you find the “cloneable” toggle and turn that on. We want our group to be cloneable for this example.
Towards bottom of the field settings, find and click on the “+ Add Subfield” button to add your first group subfield.

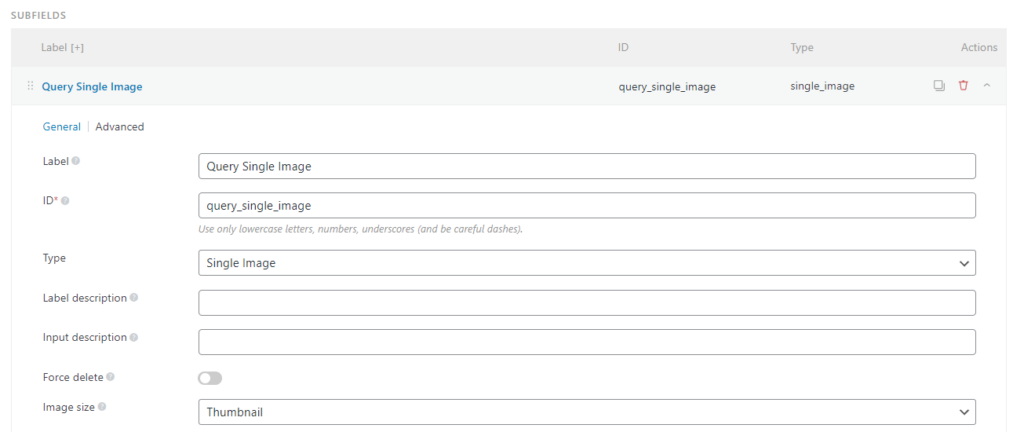
In this tutorial, we are going to work with images. Select the field “Single Image” to add it to your group. You can change the label and ID to fit your own use case. Your subfield should look something like this.

The default location settings for your custom field are set to posts. If you want to add these fields to a custom post type, you will need to adjust your settings to explicitly tell this custom field where to be displayed. For this tutorial, we will work with posts.
Create A New Template In Bricks Builder
Setup Bricks Quick Step Guide
- Create a new blank template
- Set the display conditions to match the location of your custom field display conditions
- Add a section, container, and an image
- Query loop the container and select your group field
- Map the dynamic data source for the image to the single image subfield
- Go add images to a new post and clone the group field as many times as you need
- View the magic on the frontend.
Create a new blank Bricks template and set the display conditions to display on pages, posts, or custom post type.
If you aren’t familiar with this process, edit your template with Bricks, find the gear icon and click it, find the “Conditions” drop down, click “+ Add Condition”, select “Post type” and then choose “Posts” or “Pages” or wherever you want this template to display. The settings below will tell this template to apply to all posts.

Create the following structure in the structure panel:
- Section
- Container
- Image
- Container

Select the container and toggle the Query Loop to on. Click the query loop icon (infinity icon) and then select your Meta Box group in the drop down. This is where it is important to name your group something you can recognize.

Now, let’s go select your image in the structure panel and map the source to the single image subfield you created inside the group.
To do so, make sure you are in the content tab on the left side of the screen and click the lightning bolt in the “Select dynamic data” input box.

Here you want to find your custom subfield and select it.

That is all you must do to set up this section to query the cloneable group fields. Of course, this is a very simple example and you may want to add styles to your elements. But you can expand this workflow to sliders, accordions, or any other nestable element Bricks has to build with.
Add Images To A Post And View On The Front End
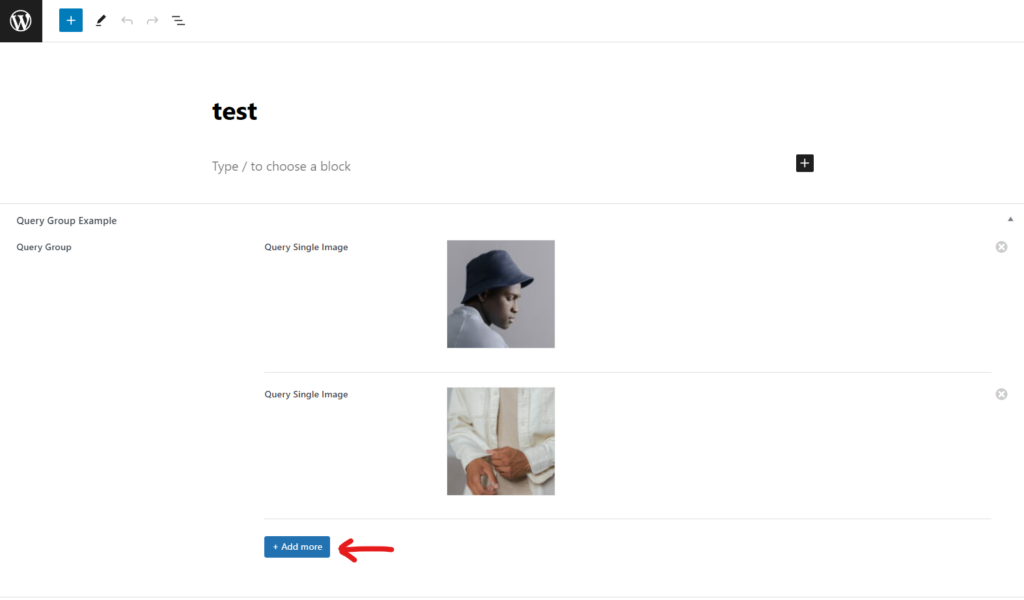
Now you need to go create a new post and add images to the cloneable group field. Because we made the group cloneable, we can click “+Add more” to add as many pictures as we need AND they are saved to this post.

After you add your images and save your post, it’s time to view it on the front end. If you set up everything up correctly, you should see your images on the front end. Depending on your own styles, it may look something like this:

FAQs For How To Query A Meta Box Group In Bricks Builder
What is a Meta Box Group and why should I use it in Bricks Builder?
A Meta Box Group allows you to organize related custom fields into a cohesive unit, enhancing the structure and accessibility of your data. In Bricks Builder, utilizing Meta Box Groups enables you to create more dynamic and structured content, as you can query and display related information collectively, ensuring a streamlined and intuitive user experience.
How can I make a Meta Box Group cloneable and why is this feature useful?
To make a Meta Box Group cloneable, you simply need to toggle the “Cloneable” option to ‘on’ within the group settings. This feature is particularly useful when you need to duplicate a set of related fields multiple times within the same post or page, like showcasing a series of images or listing multiple product features. It saves time and ensures consistency across your content.
Can I use nested groups within Meta Box, and how do they work in Bricks Builder?
Yes, Meta Box allows you to create nested groups, meaning you can have groups within groups. This is especially handy for organizing complex data structures. When you query these nested groups in Bricks Builder, you can access and display this structured data in a layered, hierarchical manner, enabling you to build detailed and nuanced content layouts.
How do I add and display custom field data from a Meta Box Group in a Bricks Builder template?
- Prepare Your Meta Box Group: First, ensure your Meta Box Group is properly set up and added to a post or custom post type where you intend to display the data.
- Create a New Template in Bricks Builder: Navigate to Bricks Builder and create a new template. Set it to show on the specific posts, pages, or custom post types where your Meta Box Group data will appear.
- Activate the Query Loop: Within your new template, activate the Query Loop feature. This allows you to iterate over your content and pull in data from your Meta Box Group. Find the Query Loop option and select your Meta Box Group from the dropdown list. This connects your Meta Box Group data to the template.
- Map Meta Box Fields to Template Elements: Now, for each element in your Bricks Builder template that should display data from your Meta Box Group, map it to the corresponding field within the group. For example, if you have an image field in your group, select the image element in your template and link it to this field.
Conclusion For How To Query A Meta Box Group In Bricks Builder
Harnessing the power of Meta Box Groups within Bricks Builder unlocks a new level of dynamic content presentation on your WordPress site. This tutorial guided you through the steps to set up and query Meta Box Groups in a Bricks Builder template. Using group fields allows you to display grouped and structured data in an organized manner. Whether you’re showcasing a gallery of images or displaying product images, the integration of Meta Box Groups with Bricks Builder’s query loop offers a robust solution for your content management needs.
Need Help With Bricks Builder?

