In this post, we’re going to discuss how you can clone a Github suppository to your local drive using Mac Terminal or Windows command prompt. It doesn’t take long at all to setup and download the files. However, there are a few prerequisites that you need to set up first.
Process Steps To Clone A Github Repository
To clone a Github repository, you need to complete the following actions:
- Create an access token inside Github.
- Create a directory to store your file on your local machine.
- Inside Terminal, change directory into this new location.
- Run the command to clone the data.
Note – the folder you want to clone your Github repository into must be empty!
The hardest step in the process is the first one, creating your access token. Most of my code lives in private repositories. That means I am the only user that has access to the code. That is why we need to create a token to allow access to the repository files.
How To Create The Access Token Inside Github
To create your access token, first log in to your Github account and then navigate to this link: https://github.com/settings/tokens
You can also get there by clicking on your user photo in the top right, finding the Settings tab, and then finding the Developer settings tab at the bottom of the left sidebar, and then finding the Personal access tokens section at the bottom of the left sidebar.
Just click the link to the Personal access tokens screen.
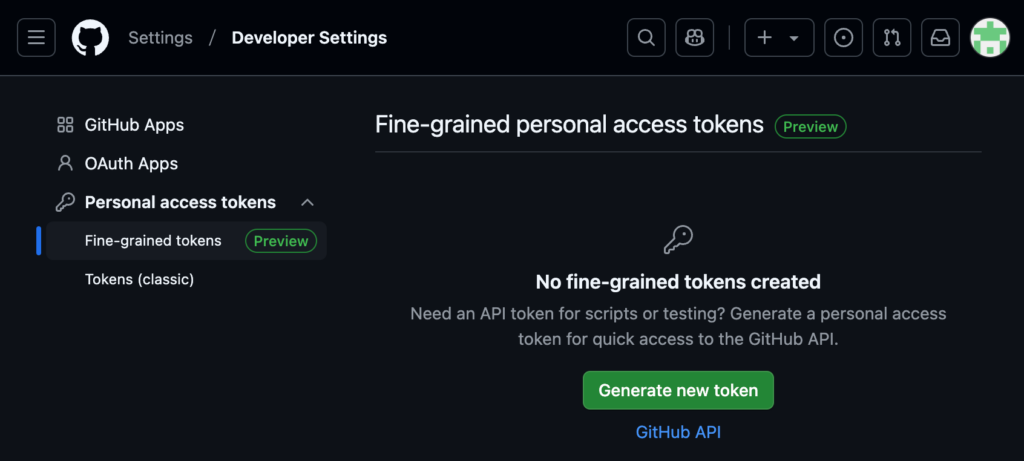
Image shows the settings –> tokens screen where you create your access token.

In the left sidebar, find the Personal access tokens tab and click into it. There are two token types:
Both of these token types work, but I use the fine-grained token type. I have it selected in the image above.
Select the fine-grained token and click the “Generate new token” button. You may be prompted to enter your password.
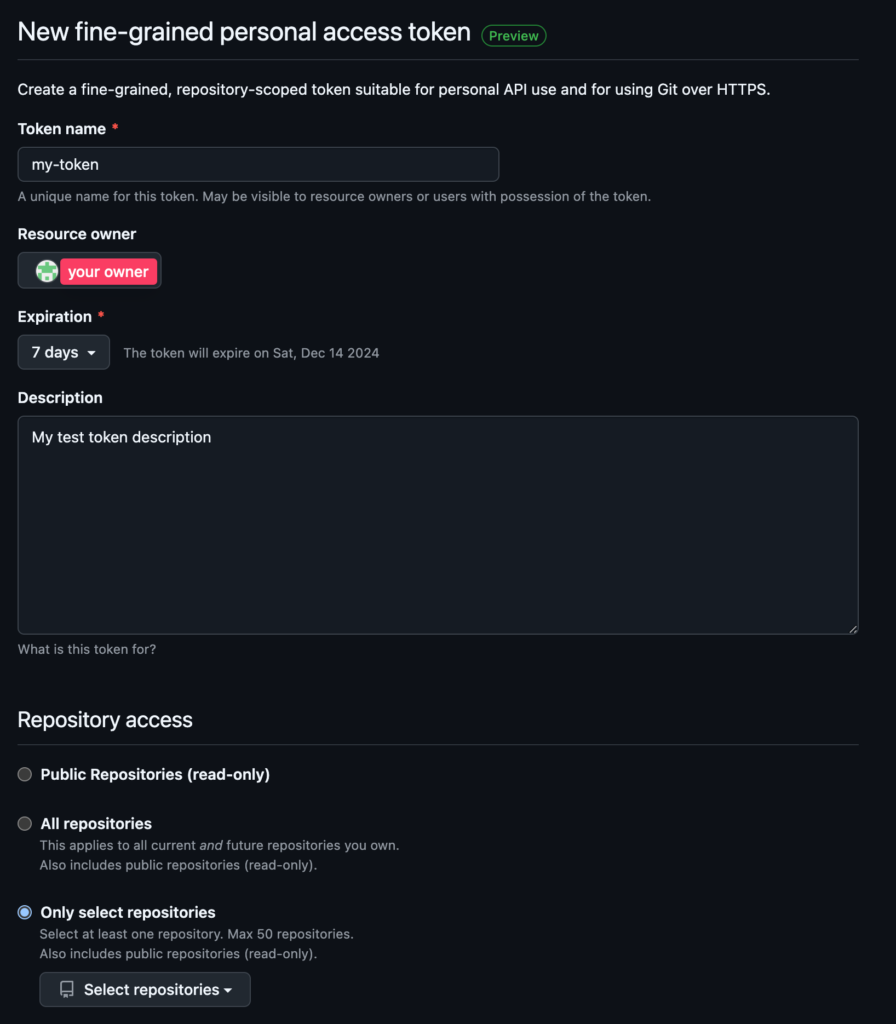
Give your token a name (no spaces—use dashes like “my-token”), select a resource owner, set the expiration date, and then give a description.
Note – the expiration date is important! Set a date that makes sense for your use case. I like to set a small window so I don’t forget about the token and leave it open forever.
Next, select either All repositories or Only select repositories. I recommend only select repositories so you can micromanage access by repository.
But if you want to access any repository inside your account with your token, then you should pick All the repositories option.
Here is the settings panel you need to fill out:

And here is the repository access panel demonstrating what it would look like to restrict access to a specific repository. You would need to click the drop down to select your repository.

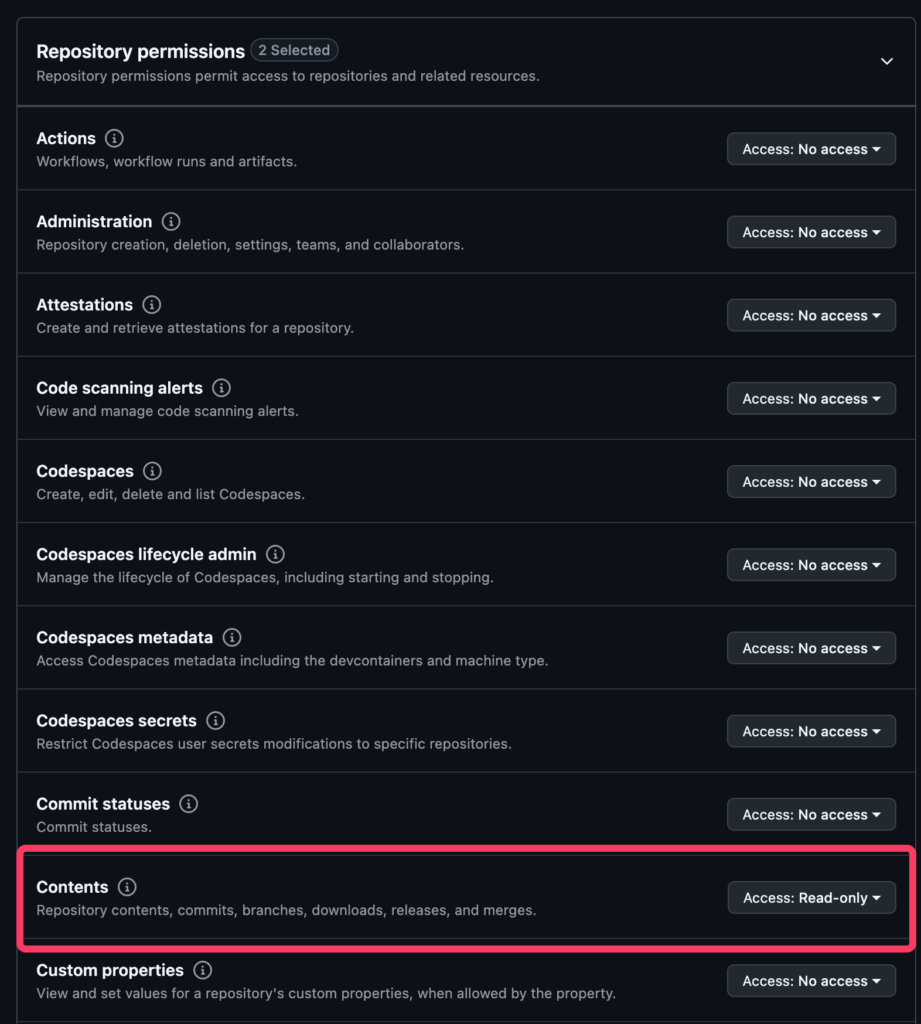
Next, find the Permissions section, click the Repository permissions accordion, and find the “Contents (Repository contents, commits, branches, downloads, releases, and merges) permission”.
Select read-only access and then scroll to the bottom and click “Generate token” button.
Your new access token will pop up and you need to copy it and save it in a secure location. If you lose it or forget to save it, you can always repeat the process above to generate a new token.
Thats it! You now have a token you can use to access your files and download them.

Steps to Download the Github Repository from Mac Terminal
We are going to create some new directories to store the new files, and then change into those directories.
Note – The folder you want to save your new directory must be empty. That is why we are creating new empty folder to store our repository data. If you want to use Finder to create a new folder, that is fine too. You will still need to change directory (cd) into that folder inside Terminal.
In the video, we change directory into our documents folder, then make a new folder called temp, then change into that directory.
Now would be a good time to go and locate your home directory name. You can find it by opening Finder and looking for the home icon, like the image below:

My home directory name is john. Here is a little terminal snippet to find it:
Find your home directory:
echo $HOMEFind your home directory + documents folder:
echo $HOME/DocumentsFor this tutorial, we are going to store everything in a folder called “temp”. The new temp folder will be located in your home directory–>documents folder. So the path would look like this home directory–> documents –> temp.
Open Mac Terminal
I am going to show you a couple ways to access directories (aka folders) and create new directories using terminal.
Open Terminal by pressing CMD + Spacebar and searching for “Terminal”.
Inside terminal, change the directory to your documents folder (or any location of your choosing) by modifying the following commands:
cd /Users/home directory name/DocumentsOR here is a shortcut 🙂
cd $HOME/DocumentsNow we make a directory in our documents folder called temp
mkdir tempNow we move into the directory by using cd command
cd tempOMG John none of that worked what now?
If none of the above commands worked, run these two commands instead:
mkdir $HOME/Documents/tempcd $HOME/Documents/tempCreate the command to download your Github repository
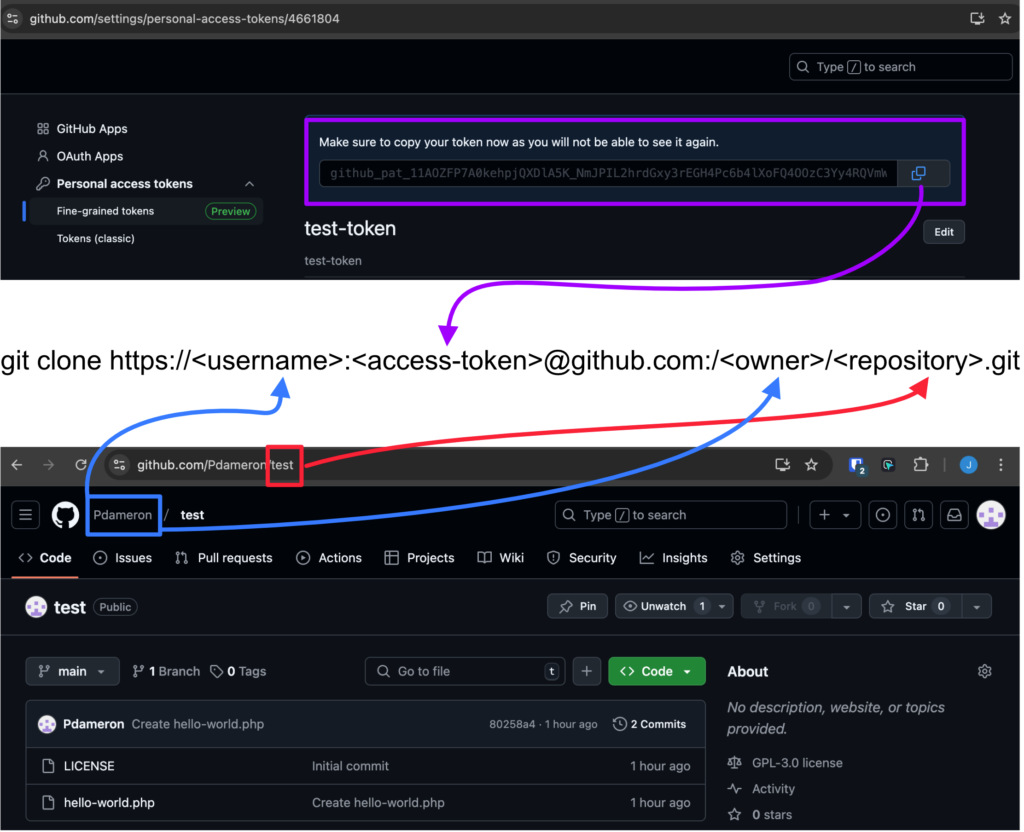
You need to gather up 4 variables to get this command to work. They are:
- Your github repository Resource owner (typically your user name).
- Your access token.
- Your link to the repository.
- Your user name.
the syntax to clone your repository is:
git clone https://<username>:<access-token>@github.com/<owner>/<repository>.gitOptionally, GitHub also supports using oauth2 as the username, like this:
git clone https://oauth2:<access-token>@github.com/<owner>/<repository>.git
The command below has all the pieces to the puzzle. You have to put them together and you can do it! Take your time and work through each variable slows.
Here is what the full command would look like with a working access token:
git clone https://pdameron: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@github.com/pdameron/test.gitif you run this command, you will download this repository to the folder you are inside in Terminal:
https://github.com/Pdameron/test
This repository as a license file and a hello-world.php file that will echo “hello world”.
Conclusion
It is not easy to download entire repositories from Github. You need to have some basic knowledge repositories and how to generate the access token. You must figure out the four variables above to build a working command. Those variables are:
- Your github repository Resource owner (typically your user name)
- Your access token
- Your link to the repository
- Your user name
There are a few different ways to clone a Github repository to your local drive, but I this this method works the fastest. You could even program the variables and commands into a Stream Deck workflow to build the command as fast as possible.
If you have any questions, you can get assistance in the Bricks Coach Community!
Need Help With Bricks Builder?

