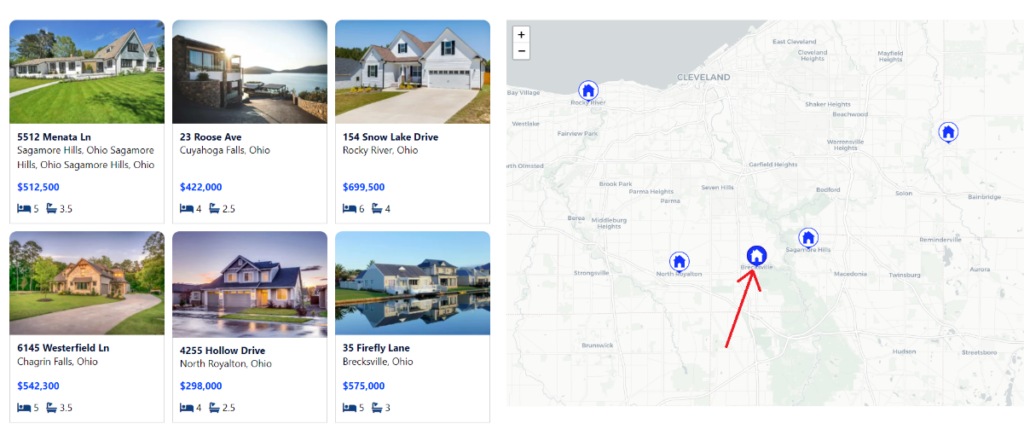
When I first saw the WP Grid Builder map demo, I was impressed. I knew I wanted to build a map component that functioned like the demo. One neat detail about the map is the marker changes when you hover over the corresponding card.
In this tutorial, I will show you how to change the WP Grid Builder map marker on hover with Bricks Builder.
Please note: this tutorial has a prerequisite of a functioning map built with:
- a Bricks Builder query loop
- a custom post type for locations (MetaBox or ACF)
- a map custom field (MetaBox or ACF)
- an address custom field (MetaBox or ACF)
- a WP Grid Builder Map Facet
Let’s dive in!
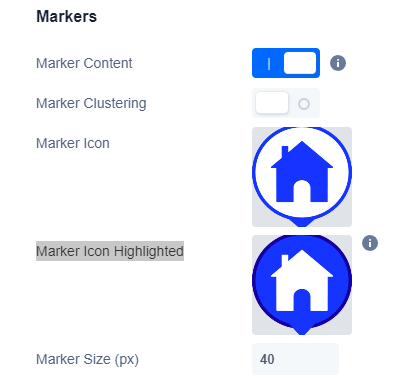
Step 1: Setup Custom Icons For The Map
Navigate to your map facet inside WP Grid Builder and click on the behavior tab. Next, scroll to the bottom where you see the markers section.
You will need two different icons for this to work. One icon is for the idle state, and one icon is for the hovered state. WP Grid Builder calls is “Marker Icon” and “Marker Icon Highlighted”.
Each icon needs to look different enough for the users to notice the difference. So, make the “Marker Icon Highlighted” a darker color, or a different icon altogether.
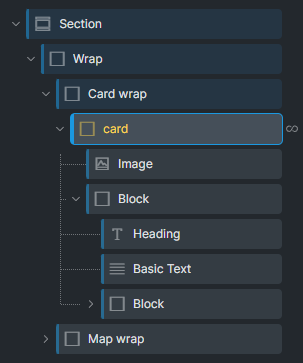
Step 2: Add WP Grid Builder Classes And IDs to Your Card
This part is tricky, so I’ll go over the structure panel of my setup first and then cover the classes and IDs.
The Structure Panel
I have the card highlighted below because this is the element you want to add the classes and IDs. This card is also where I have my query loop set up to pull in the custom post type data running the map.
Add The CSS Class and Dynamic ID
On this card wrapper you want to add the following classes and IDs.
To do so, go to the style section –> the CSS tab –> find “CSS Classes” and “CSS ID”
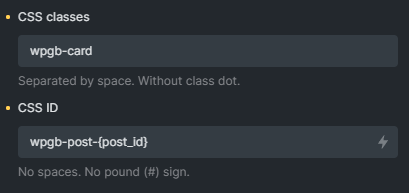
The CSS class will be wpgb-card with no dot. That’s the easy part.
The ID is a bit harder because you need to add the post ID for each post in the query loop.
Type the CSS ID in just like the image below:
You can hit the lightening bolt to select the dynamic data tag for Post ID if you type it out yourself.
To change the hover icon on the map when you hover one of the location cards, WP Grid Builder’s code needs an element ID with the POST ID because this forms the relationship between the card and the marker!
Time To Test Changing The WP Grid Builder Map Marker On Hover With Bricks Builder
As long as you followed the instructions above exactly, you should be able to hover over your query loop card (or whatever element you built) and the icons should swap out on the map.
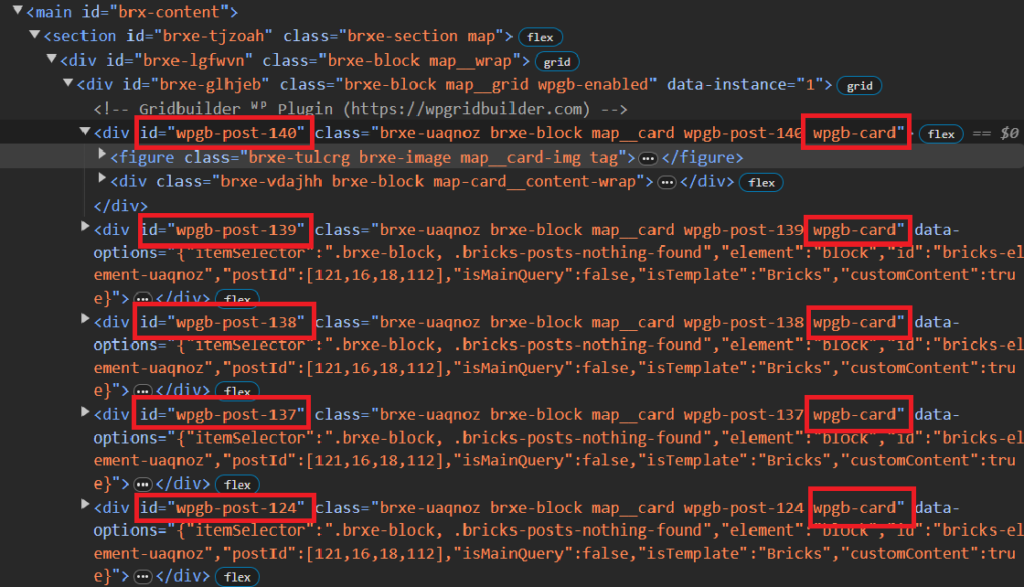
If it is not working, double check the CSS class “wpgb-card” is on every single wrapper that is output by the query loop. Then, double check that each wrapper has the dynamic ID like “wpgb-post-140”.
Your DOM should look like this image below. This is the output of the query loop.
Troubleshooting FAQs
Why isn’t the map marker changing when I hover over the card?
There are a few common reasons for this issue:
- Ensure that you have correctly added both the
<strong>wpgb-card</strong>class to your card wrapper and the dynamic ID with the format<strong>wpgb-post-post id dynamic data</strong>. - Double-check that you have selected the correct icons for the idle and hovered states in the WP Grid Builder settings.
- Make sure your WP Grid Builder Map Facet is correctly configured to interact with these dynamic elements.
How do I ensure that each card has the correct dynamic ID?
When setting the CSS ID in Bricks Builder, make sure you use the dynamic data tag for the Post ID. This can usually be done by typing out the ID format as wpgb-post- and then selecting the dynamic tag for Post ID, ensuring that each card automatically receives its unique post ID.
Can I use custom icons for the map markers?
Yes, you can use custom icons for your map markers. In the WP Grid Builder settings under the markers section, you can upload or select your custom icons for both the idle state (Marker Icon) and the hovered state (Marker Icon Highlighted). Ensure your icons are visually distinct to make the hover effect noticeable.
Why do the changes not appear immediately on my site?
If you don’t see your changes reflected immediately, try the following:
- Clear your browser cache and the cache on your website if you’re using a caching plugin or service. Caching can sometimes prevent new changes from appearing right away.
- Double-check that you have saved all changes in both WP Grid Builder and Bricks Builder.
- Ensure that there is no JavaScript error on the page that might interfere with the hover effect. You can check this by looking at the console in your browser’s developer tools.
Conclusion : Changing The WP Grid Builder Map Marker On Hover With Bricks Builder
By following the steps outlined in this tutorial, you should now be able to seamlessly change the WP Grid Builder map marker when hovering over a corresponding card in Bricks Builder. This enhancement not only improves the visual appeal of your map component but also enhances user interaction, making it easier for users to navigate your map and understand the connection between the map markers and the location cards. Remember, the key to success lies in setting up your icons correctly, applying the right classes and IDs, and ensuring that each element of your query loop is correctly configured. With a bit of patience and attention to detail, you’ll elevate the user experience on your website, making your map component both functional and engaging.
Need Help With Bricks Builder?