The Bricks Builder Slider is an element that lets you add a slideshow to your website. Users can see each slide by clicking a button to move to the next slide or you can set it to auto play. Sometimes sliders are also called carousels. The Bricks Builder Slider uses Splide.js JavaScript library to control how the slide show works. In this tutorial, we will learn how to add animations to the Bricks Builder slider element with CSS.
How To Add Animations To Bricks Builder Slide
The first step to adding animations to a Bricks BUilder slide is to examine the DOM structure to understand how the Splide.js is manipulating the DOM. When a new slide comes into view, the DOM changes dramatically and new classes and data attributes are added and removed from the slides.
What you want to do is focus on the visible slide to see if there is a class that is added that we can target with CSS. Luckily there is!
The “is-visible” class is added to the slide that comes into view.
That class name makes since because the new slide is now visible, thanks Splide.js!
Check Out Our Premium Components!
We have a library of expertly crafted components made to enhance your Bricks websites!
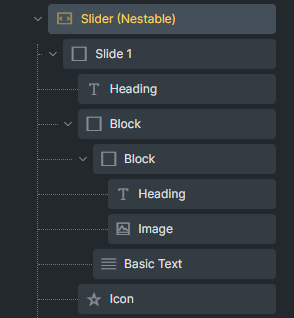
See The ComponentThe Structure Panel Of A Typical Bricks Builder Slider
The Slider structure is made up of the parent Slider where you can edit the controls and behaviour. Inside the slider are individual slides. Each slide will have wrap elements like images, headings, icons, etc. Your slider structure may look something like this:
Where To Add Your Custom CSS in The Bricks Slider
Your next step will be to decide where you want to add the custom CSS. I recommend adding it to the slider and not to the individual slide. See the image above to see the slider marked with yellow text. Put your CSS there.
I always like adding my custom CSS to the top level element I am working with. That way, I always know where to look when I am working inside the builder.
Target Elements Inside Your Individual Slide With CSS
To add the animation to each element inside the slide, you must target the ID of the element, or even better, a custom class placed on the element.
So lets focus on the heading only for this example. You can expand on more elements inside your slide using the same technique.
Step 1 Add A Class To The Element You Want To Animate
Add a class to your heading. You can name it whatever you like, but something like .slide__heading will work great! So go to your heading, and add the class inside Bricks Builder. You don’t need to add any styles to this class using the builder because we will do this with custom CSS.
Step 2 Add Custom CSS To Your Slider Element
Now go to your parent slider element and in your Custom CSS you can add this code:
%root% .is-visible .slide__heading{
 opacity: 1;
 transform: translateY(0) translateX(0px);

}

%root% .slide__heading{
 opacity: 0;
 transform: translateY(-10px) translateX(-10px);
 transition: transform 1s ease;
}
What we have done is added some translate X and Y CSS to the heading when it is invisible and when it is visible. This will give us a nice animation that will give the heading some movement when the slide comes into view.
Make note: the .slide__heading CSS transition is only targeting the transform property. if you want to target more properties with transition, consider modifying the transition to target all properties like so:
%root% .slide__heading{
 transition: all 1s ease;
}
Final Thoughts On How To Add Animations To The Bricks Builder Slider Element
With only a few lines of CSS, you can add simple animations to your Bricks Builder Slider. These animations are subtle, but I have always found that my clients like a bit of “flare” or “pop” on their websites. Even though this animation is simple and only took a few lines of code, the end result is a polished slider component that will impress your clients. Remember, the class .is-visible is added dynamically to the visible slide. This is the key to adding the animations!
Need Help With Bricks Builder?